Flush mount lighting solves one of the kitchen’s trickiest design challenges: delivering bright, functional light without eating up valuable headroom or clashing with cabinetry. Unlike pendants or chandeliers that hang down, flush mounts sit tight against the ceiling, ideal for standard 8-foot ceilings, low-clearance areas, or spaces where visual clutter needs to stay minimal. They’re workhorses in galley kitchens, over sinks, and in walk-through zones where a dangling fixture would get in the way. With LED technology, improved designs, and finishes that range from industrial to farmhouse, today’s flush mounts deliver both lumens and style without compromise.
Table of Contents
ToggleKey Takeaways
- Flush mount lighting for kitchens maximizes vertical clearance by sitting tight against the ceiling, making rooms feel taller while keeping sightlines open without interfering with cabinet doors or tall users.
- Choose fixtures in the 1,200 to 1,800 lumen range and space them 4 to 6 feet apart; kitchens need 50 to 75 lumens per square foot according to IES recommendations for balanced ambient and task lighting.
- Select color temperatures between 3000K and 4000K with a Color Rendering Index (CRI) of 90 or higher to accurately render food and finishes while avoiding overly yellow or clinical lighting.
- Popular flush mount styles include drum mounts, geometric cage designs, schoolhouse milk glass, and low-profile LED panels—each suited to different kitchen aesthetics from farmhouse to modern minimalist.
- Turn off power at the breaker panel and verify the electrical box is securely fastened to a ceiling joist before installation; hire a licensed electrician if wiring is outdated or if the circuit breaker trips repeatedly.
What Is Flush Mount Lighting and Why Choose It for Your Kitchen?
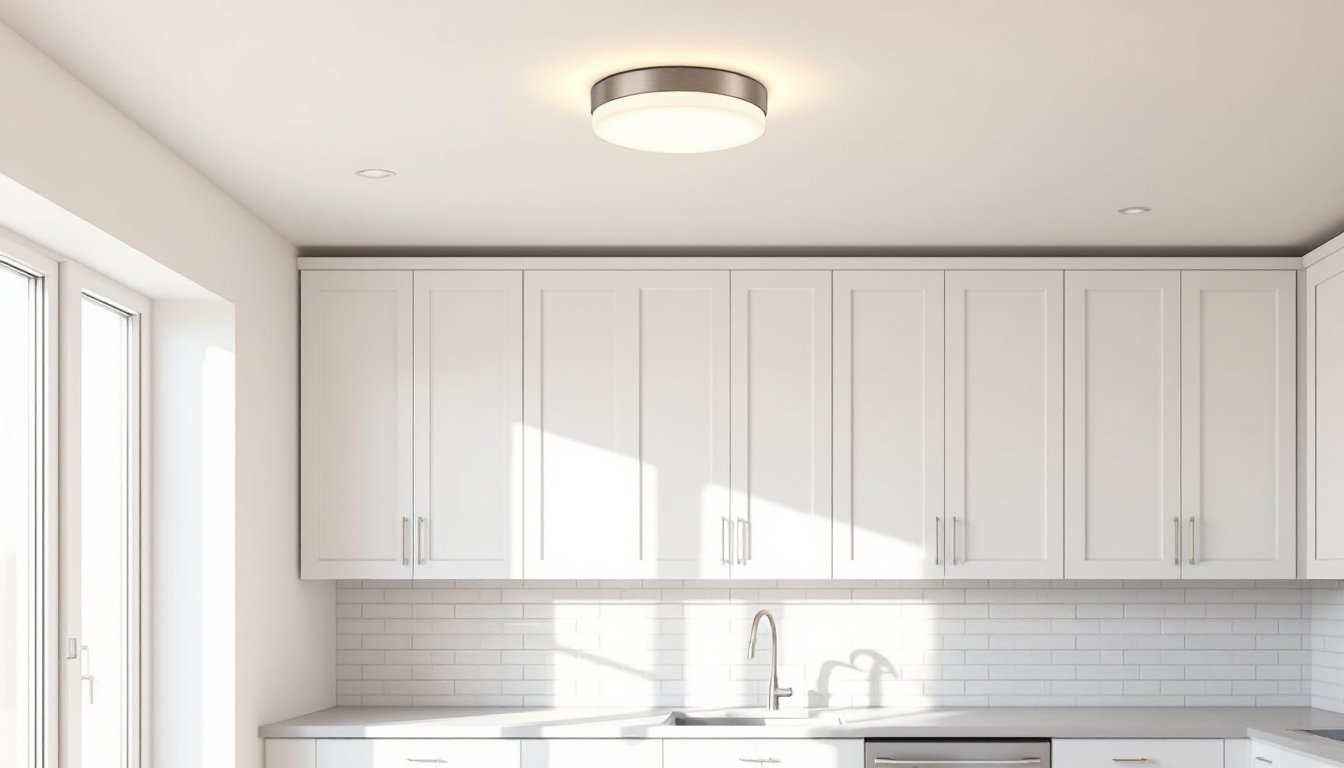
A flush mount fixture installs directly against the ceiling with no gap or downrod, keeping the profile as low as possible, typically 3 to 6 inches from ceiling to bottom of the fixture. The canopy covers the electrical box, and the light diffuses through glass, acrylic, or fabric.
Kitchens benefit from flush mounts in several scenarios. In homes built before the 1990s, 8-foot ceilings are standard, and hanging fixtures create head-clearance issues or visual bulk. Flush mounts keep sightlines open and won’t interfere with tall users or cabinet doors. They’re also code-friendly: the National Electrical Code (NEC) requires fixtures in certain locations to maintain clearance from combustibles and water sources, making flush mounts a safer pick near range hoods or above sinks where steam and grease are present.
Another advantage: ease of cleaning. A pendant collects grease on every surface: a flush mount has one accessible plane. Wipe it down monthly with a damp microfiber cloth and degreaser, and it stays clear. For kitchens that double as thoroughfares, think open-plan layouts or hallways leading to dining areas, flush mounts eliminate the risk of someone walking into a hanging fixture.
Key Benefits of Flush Mount Kitchen Lighting
Maximized vertical clearance. Every inch counts when cabinet uppers are already at 18 inches above the counter. Flush mounts keep the ceiling plane uninterrupted, making the room feel taller.
Even, diffused light. Most flush mounts use a translucent shade or frosted glass that spreads light in a wide cone, reducing harsh shadows. This works well for ambient lighting or supplementing under-cabinet task lights. Pair a 1,200- to 1,600-lumen LED flush mount with dedicated task lighting for a balanced scheme.
Lower installation complexity. No need to calculate chain length, adjust a downrod, or worry about leveling a multi-arm chandelier. Flush mounts mount to a standard 4-inch round or octagonal electrical box. If the existing box is rated for the fixture weight (check the label inside the box, most are rated for up to 50 pounds), installation is straightforward: connect hot, neutral, and ground, then screw the canopy into place.
Versatility across kitchen zones. Use them over breakfast nooks, in pantries, above islands where pendants might obstruct conversation, or as secondary fixtures in large kitchens. A flush mount in a walk-in pantry provides overhead coverage without taking up shelf clearance.
Energy efficiency. LED flush mounts draw 12 to 20 watts while producing the equivalent of a 75- to 100-watt incandescent. At 25,000+ hour lifespans, they outlast the average kitchen remodel cycle. Look for fixtures with integrated LEDs or those compatible with standard E26 medium-base bulbs if replaceable bulbs are preferred.
How to Choose the Right Flush Mount Fixture for Your Kitchen
Selecting a flush mount involves more than aesthetics. Dimensions, lumen output, color temperature, and finish all affect performance and longevity.
Size and Placement Considerations
Diameter matters. For a kitchen with a footprint of roughly 10×12 feet, a fixture between 12 and 16 inches in diameter provides adequate coverage. Go smaller (8 to 10 inches) for pantries, hallways, or above sinks. Larger kitchens, 14×18 feet or more, benefit from 16- to 20-inch fixtures or multiple smaller units spaced evenly.
Ceiling height and proportion. On an 8-foot ceiling, keep fixtures under 6 inches in height to maintain clearance and avoid a “bulky” look. For 9- or 10-foot ceilings, semi-flush mounts (which hang 4 to 12 inches down) become an option, but true flush mounts still work if the design is bold enough to anchor the space visually.
Spacing for multiple fixtures. If installing more than one, space them 4 to 6 feet apart and at least 2 feet from walls to prevent dark corners. In galley kitchens, center fixtures along the length of the room. For L-shaped or open layouts, align them with major work zones, sink, range, and prep counter.
Lumen output. The Illuminating Engineering Society (IES) recommends 50 to 75 lumens per square foot for kitchens. A 120-square-foot kitchen needs roughly 6,000 to 9,000 lumens total. If relying solely on flush mounts, choose fixtures in the 1,200 to 1,800 lumen range and plan for multiple units or supplement with under-cabinet lighting.
Style and Finish Options
Glass vs. acrylic diffusers. Glass is heavier, more scratch-resistant, and easier to clean, but it’s fragile. Frosted acrylic is lighter, impact-resistant, and often less expensive, ideal for high-traffic or family kitchens. Opal or alabaster glass offers a warmer glow: clear seeded glass works in industrial or transitional designs.
Metal finishes. Brushed nickel and oil-rubbed bronze remain popular for traditional and transitional kitchens. Matte black fits modern farmhouse and industrial aesthetics. Polished chrome or stainless steel complements contemporary kitchens with stainless appliances. Match or intentionally contrast with cabinet hardware and faucet finishes for cohesion.
Color temperature. Kitchens function best with 3000K to 4000K (warm white to neutral white). Below 3000K feels too yellow for food prep: above 4500K can look clinical. Choose fixtures with a Color Rendering Index (CRI) of 90 or higher to render food, finishes, and paint colors accurately.
Dimming capability. Not all LED flush mounts are dimmable. If installing on a dimmer switch, verify compatibility and use an LED-rated dimmer (standard incandescent dimmers cause flicker). Dimming extends LED life and adds flexibility for ambient vs. task lighting.
Top Flush Mount Lighting Styles for Modern Kitchens
Drum flush mounts. A fabric or metal drum shade with a diffuser on the bottom provides soft, even light. Works well in transitional kitchens and pairs with shaker cabinets. Typical diameter: 14 to 18 inches.
Geometric and cage designs. Open metalwork in hexagon, square, or round cages adds visual interest without bulk. Popular in industrial and modern farmhouse kitchens. These often use exposed Edison-style bulbs, so choose LED filament bulbs for efficiency.
Schoolhouse and milk glass. A classic option for vintage, cottage, or farmhouse kitchens. The white glass diffuses light well and complements subway tile and butcher block. Standard sizes run 10 to 14 inches.
Low-profile LED panels. Flat, square, or round panels that sit nearly flush (1 to 2 inches deep) and distribute light evenly with edge-lit or back-lit LEDs. Ideal for ultra-modern or minimalist kitchens. Often found in 3000K or 4000K with high CRI.
Coastal and nautical flush mounts. Fixtures with rope details, weathered finishes, or porthole-style glass suit beach-house or casual kitchens. Typically constructed from rust-resistant materials like powder-coated steel or brass.
Art Deco and mid-century designs. Fixtures with starburst patterns, frosted glass globes, or geometric metalwork fit retro or eclectic kitchens. Often available in brass, aged bronze, or two-tone finishes.
Installation Tips and Best Practices
Safety first. Turn off power at the breaker panel, not just the wall switch. Use a non-contact voltage tester to confirm the circuit is dead before touching any wires. Wear safety glasses to protect against falling debris or loose plaster.
Check the electrical box. Verify it’s securely fastened to a ceiling joist or blocking. Retrofit boxes that clamp onto drywall alone aren’t rated for fixtures over a few pounds. If the box is loose or damaged, replace it with a metal ceiling box rated for fan support (up to 70 pounds), even if you’re not installing a fan, it’s the sturdiest option.
Wire connections. Strip insulation cleanly with wire strippers, about 1/2 inch for solid wire, 3/4 inch for stranded. Connect black (hot) to black, white (neutral) to white, and bare copper or green (ground) to the ground screw or wire. Use wire nuts rated for the wire gauge (typically 14 or 12 AWG in residential kitchens). Tug each connection to confirm it’s secure.
Mount the fixture. Most flush mounts use a crossbar that screws into the electrical box. Align the fixture canopy over the crossbar and secure with the provided screws or knurled nuts. Don’t overtighten, strip the threads and you’ll need anchors or a new box.
Level and finish. Use a small torpedo level across the canopy before final tightening. A crooked fixture is obvious on a flat ceiling plane. Once secured, install the shade, diffuser, or bulbs per manufacturer instructions.
Test and adjust. Restore power and test the fixture. If it flickers, check wire connections and dimmer compatibility. If the light is too harsh, swap to a lower-lumen bulb or add a dimmer. If it’s too dim, verify the bulb wattage matches the fixture rating and that dust or film isn’t blocking the diffuser.
Consider a helper. Ceiling work is awkward. A second person to hold the fixture while wiring saves frustration and reduces the risk of dropping the fixture or straining a shoulder. A sturdy 6-foot stepladder is safer than a chair or stool.
When to call a pro. If the existing wiring is cloth-wrapped (common in pre-1950s homes), aluminum, or the circuit breaker trips repeatedly, hire a licensed electrician. Same if you’re adding a new circuit, relocating a junction box, or working in a kitchen undergoing a permit-required remodel. Most jurisdictions require electrical work to be inspected, and DIY wiring that’s not up to code can void homeowners insurance.

