Outdoor lighting transforms a Denver property after dark, highlighting architecture, improving safety on icy walks, and extending usable hours well into winter evenings. But not all landscape lighting systems hold up against the Mile High City’s freeze-thaw cycles, intense UV exposure, and rapid weather swings. Homeowners who invest in the right fixtures, placement, and installation can enjoy dramatic curb appeal and functional outdoor spaces regardless of season, while those who cut corners often face cracked lenses, corroded connections, and dead zones by spring.
Table of Contents
ToggleKey Takeaways
- Landscape lighting Denver systems must be rated for freeze-thaw cycles and UV exposure to prevent cracked lenses and corroded connections typical in the Mile High City’s climate.
- Quality outdoor lighting improves safety by eliminating dark ice patches on walkways, extends usable patio and garden hours during early winter sunsets, and increases property value by showcasing architectural details.
- LED fixtures with proper specifications (cold-rated to -40°F, powder-coated aluminum construction, and 3000K-4000K color temperature) outlast halogen systems and perform reliably through Denver’s weather extremes.
- Low-voltage systems (12V or 24V) with appropriately sized transformers, proper wire gauge for runs over 50 feet, and astronomical timers offer the best balance of safety, efficiency, and control for residential landscape lighting.
- Professional installation costs $2,500 to $6,000 for a quarter-acre lot and typically requires utility marking, trenching to 6–8 inches with conduit for hardscape protection, and on-site fixture testing to prevent glare and dead zones.
- Seasonal maintenance—including spring lens cleaning, summer vegetation trimming, fall connection testing, and winter snow clearing—extends fixture lifespan and ensures landscape lighting remains functional through all seasons.
Why Denver Homeowners Are Investing in Landscape Lighting
Denver landscape lighting addresses both practical and aesthetic needs unique to the region. With sunset arriving as early as 4:30 PM in December, exterior lighting extends the functional hours of patios, decks, and garden paths when residents want to use them most.
Safety ranks high. Ice forms quickly on shaded walkways and steps during freeze-thaw cycles common from October through April. Well-placed path lights eliminate dark spots where black ice hides, reducing slip-and-fall risks for family and guests alike.
Property values see measurable gains. A professionally designed lighting system highlights architectural details, mature trees, and hardscape features that vanish after dark without illumination. Realtors consistently note that homes with quality exterior lighting photograph better and command higher offers, particularly in competitive neighborhoods around Wash Park, Highlands, and Cherry Creek.
Security improves with strategic lighting placement. Motion-activated fixtures near entries, garages, and side yards deter opportunistic theft while avoiding the harsh, constant glare of old-school floodlights. Layered lighting creates the impression that someone’s home without lighting every square foot of the yard.
Denver’s outdoor lifestyle doesn’t stop when temperatures drop. Homeowners who invest in cold-rated LED fixtures enjoy fire pits, outdoor heaters, and covered patios year-round, and landscape lighting makes those spaces inviting rather than foreboding after dark.
Types of Landscape Lighting Perfect for Denver’s Climate
Choosing fixtures that tolerate Denver’s weather extremes, from subzero nights to intense summer UV, prevents premature failure and constant replacements.
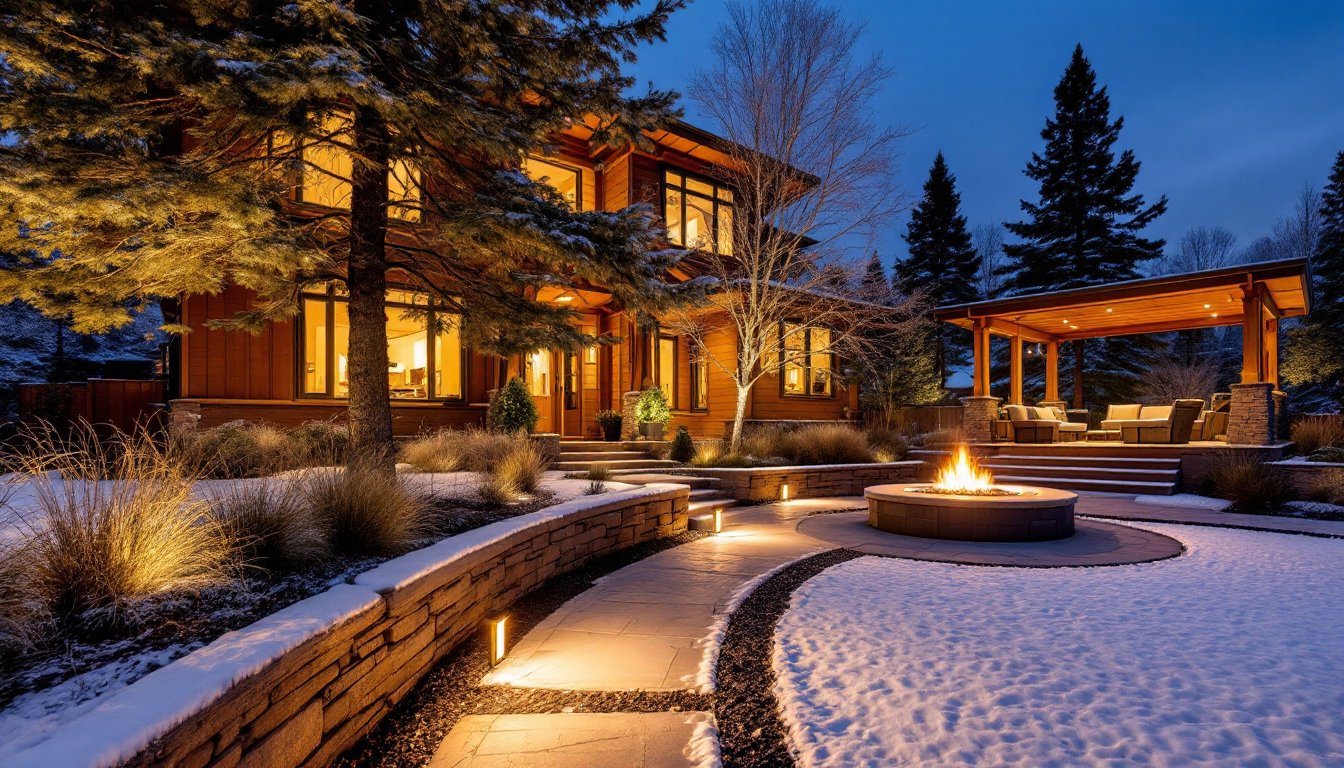
Path and Walkway Lighting
Bollard lights and low-voltage path lights work best along walks, driveways, and garden borders. Look for fixtures rated for wet locations (not just damp) and constructed from powder-coated aluminum, stainless steel, or composite materials that resist corrosion from de-icing salts and moisture.
Space path lights 8 to 10 feet apart for even illumination without harsh shadows or dead zones. Aim for 3000K to 4000K color temperature LEDs, warm enough to feel inviting but cool enough to render ice and obstacles clearly. Fixtures with shielded bulbs or downward-facing designs prevent glare and light trespass into neighbors’ windows.
Bury low-voltage wire at least 6 inches deep in conduit to protect against freeze-thaw heaving. Standard direct-burial wire often shifts and breaks as soil expands and contracts through winter.
Accent and Feature Lighting
Uplights and spotlights showcase trees, stone walls, architectural details, and water features. Use narrow beam angles (10–25 degrees) for tall conifers and focal sculptures: wider floods (40–60 degrees) suit stacked stone walls and broad shrubs.
Mount uplights at least 12 to 18 inches from tree trunks to avoid bark damage and allow for growth. Adjust annually as trees mature. For deciduous trees, position lights to highlight branch structure in winter, bare limbs create dramatic silhouettes against snow and night sky.
Silhouette lighting works well for ornamental grasses and architectural plants like yucca. Place a spotlight behind the plant, aimed at a wall or fence, to create a shadow effect. This technique adds depth without requiring extensive wiring.
Avoid halogen fixtures in favor of LED systems. Halogen bulbs generate excessive heat that melts snow around fixtures, creating refreeze hazards and wasting energy. LEDs perform reliably down to -40°F and draw a fraction of the wattage.
Choosing the Right Landscape Lighting System for Your Denver Property
Low-voltage systems (12V or 24V) dominate residential landscape lighting for good reason. They’re safer to install, more energy-efficient, and easier to modify than line-voltage (120V) setups. A typical low-voltage system includes a transformer, buried cable, and individual fixtures connected via quick-connect hubs or direct wire splicing.
Size the transformer appropriately. Add up the wattage of all planned fixtures and choose a transformer rated for at least 20% more capacity to allow for future expansion and prevent overload. For example, twelve 3-watt LED fixtures (36 watts total) should use a 50-watt or larger transformer. Mount transformers in weatherproof enclosures near GFCI-protected outlets, preferably under eaves or in covered areas to shield from snow accumulation.
Wire gauge matters more in Colorado’s temperature swings. Use 12 AWG or 10 AWG wire for runs longer than 50 feet to minimize voltage drop. Undersized wire causes dim fixtures at the far end of a run and accelerates LED driver failure. Run separate circuits for different lighting zones (front yard, backyard, accents) so homeowners can control them independently.
Smart controls and timers add convenience and efficiency. Astronomical timers adjust on/off times automatically as sunrise and sunset shift through the year, critical in Denver where daylight hours vary by more than five hours between solstices. Wi-Fi-enabled systems allow remote control via smartphone, useful for travel or adjusting schedules when weather changes outdoor plans.
Solar-powered fixtures rarely perform well in Denver. While appealing for their lack of wiring, solar lights struggle during short winter days and often fail to charge adequately when snow covers panels. Reserve solar for seasonal decorative accents, not primary landscape lighting.
What to Expect: Landscape Lighting Installation in Denver
Professional installation typically takes one to three days depending on property size and design complexity. Installers start with a site assessment, identifying existing electrical access, measuring distances, and noting obstacles like irrigation lines, buried utilities, and mature root zones.
Call 811 at least two business days before any digging to have utilities marked. Gas, electric, fiber, and water lines often run through front yards and parkways, and Colorado law requires notification before excavation. Fines for hitting unmarked utilities can exceed damages.
Installers trench pathways for low-voltage cable using a flat spade or trenching tool, typically 6 to 8 inches deep. They avoid cutting through established root systems when possible, routing wire around trees rather than straight through root zones. For hardscape crossings, driveways, patios, or concrete walks, conduit protects cable from crushing and simplifies future repairs.
Fixture placement follows the design plan but often requires on-site adjustments. Installers test each light’s position and aim before securing it permanently, checking for glare, proper coverage, and aesthetic balance. Homeowners should be present during this phase to provide feedback, it’s much easier to shift a fixture 2 feet before backfilling than after.
Expect to pay $2,500 to $6,000 for a professionally installed system covering a typical quarter-acre lot, though costs vary widely based on fixture quality, design complexity, and site conditions. DIY installations cut labor costs but require comfort working with low-voltage wiring, basic landscape tools, and design principles. Permit requirements are rare for low-voltage systems, but always check local codes if tying into exterior outlets or adding new circuits.
Maintaining Your Landscape Lighting Through Denver’s Seasons
Seasonal maintenance keeps landscape lighting performing through Denver’s extremes and extends fixture lifespan.
Spring: Inspect all fixtures after snowmelt. Check for cracked lenses, corroded connections, and shifted fixtures pushed by freeze-thaw heaving. Tighten any loose stakes and verify that path lights still provide even coverage, settling soil often tilts fixtures off-angle. Clean lenses with a damp cloth to remove winter grime and salt residue that dims output.
Summer: Trim vegetation around uplights and path lights. Fast-growing perennials and ornamental grasses can block fixtures entirely by mid-July. Adjust fixture angles if tree growth has changed canopy shape or coverage. Verify that timers still match sunset times, most astronomical timers auto-adjust, but older mechanical units may need manual resetting.
Fall: Clear leaves and debris from fixtures before first snow. Organic matter trapped around lights promotes corrosion and blocks ventilation slots on LED drivers. Test all connections and replace any dimming bulbs before winter limits outdoor access. Consider adding lighting to areas that ice up first, north-facing steps, shaded walks, and spots where roof runoff freezes.
Winter: After heavy snows, gently clear fixtures to restore light output, but avoid forcing ice off lenses or kicking buried fixtures. If an entire circuit goes dark, check the transformer’s GFCI outlet, snow or ice buildup can trip the breaker. Wait for a thaw to troubleshoot wiring issues unless it’s a critical safety path.
Replace LED bulbs or fixtures if they dim noticeably or fail. Quality LEDs last 25,000 to 50,000 hours (roughly 10 to 20 years of typical use), but cold cycling and moisture can shorten lifespan in cheaper products. Keep spare bulbs and wire connectors on hand for quick fixes, most issues resolve with a simple bulb swap or wire reconnection.
Professional maintenance visits once or twice a year ensure the system stays optimized, especially for complex designs with multiple zones and smart controls.

