Malibu landscape lighting has become a go-to choice for homeowners looking to add safety, security, and curb appeal without hiring an electrician or pulling permits. These low-voltage systems run on 12 volts instead of standard 120-volt household current, making them safer to install and easier on the wallet. Most kits include a transformer, cable, and fixtures that snap together in an afternoon. Whether someone’s highlighting a walkway, uplighting a tree, or adding ambiance to a patio, Malibu offers a range of fixture styles and wattages that work for modest budgets and DIY skill levels.
Table of Contents
ToggleKey Takeaways
- Malibu landscape lighting operates on safe 12-volt systems that allow homeowners to skip permits and electricians, with most kits installing in an afternoon without specialized skills.
- A basic Malibu lighting kit costs $50–$150 and uses LED fixtures consuming only 1–4 watts each, making it significantly more affordable and energy-efficient than traditional line-voltage outdoor lighting.
- Proper design combines layered lighting (path, accent, and ambient), uses odd-numbered fixture groupings, and keeps wattage balanced to the transformer capacity to avoid voltage drop on runs over 100 feet.
- Quick-connect clamps on Malibu fixtures require no wire stripping, and the flexible cable can be buried in shallow 4–6 inch trenches or laid under mulch, allowing easy repositioning as landscapes evolve.
- Annual maintenance—cleaning fixtures, checking corrosion at connections, replacing bulbs, and inspecting the transformer—keeps Malibu systems running smoothly for years with minimal effort.
What Is Malibu Landscape Lighting?
Malibu is a brand under Intermatic, known for manufacturing low-voltage outdoor lighting systems designed for residential landscapes. The term “Malibu lighting” often gets used generically to describe any low-voltage landscape lighting, similar to how “Kleenex” refers to tissues.
Low-voltage systems operate at 12 volts DC, stepping down from standard household 120-volt AC through a plug-in transformer. This reduced voltage minimizes shock risk and allows homeowners to install fixtures without an electrical license in most jurisdictions. The system uses a two-wire cable (typically 12 or 14 AWG) that runs from the transformer to each fixture along the layout.
Malibu fixtures come in kits or individual components. Starter kits typically include a transformer (ranging from 45 watts to 300+ watts), low-voltage cable, fixture stakes, and bulbs (LED or halogen). Individual fixtures can be added as needed, provided the total wattage stays within the transformer’s capacity.
Benefits of Choosing Malibu Lighting for Your Outdoor Spaces
Safety and ease of installation top the list. Because the system runs on 12 volts, there’s no need for conduit, junction boxes, or GFCI outlets at every fixture. Most codes don’t require permits for low-voltage landscape lighting, though it’s worth confirming with the local building department. The cable can be buried in a shallow trench (typically 6 inches) or even laid on the surface under mulch in some setups.
Cost-effectiveness matters for budget-conscious DIYers. A basic six-fixture Malibu kit runs between $50 and $150, while a comparable line-voltage system would require an electrician and materials costing several hundred dollars more. LED versions reduce energy consumption to around 1–4 watts per fixture, keeping monthly electric costs negligible.
Flexibility is another advantage. Fixtures can be repositioned without rewiring. If a shrub grows or a garden layout changes, simply pull the stake and move the light. This adjustability makes it easy to experiment with layouts before committing.
Aesthetic range has improved significantly. Early Malibu lights were basic plastic path lights, but current offerings include brass and copper fixtures, integrated LED designs, smart-compatible transformers, and color-changing options. Homeowners can match fixture finishes to existing hardware or choose styles that blend into the landscape.
Types of Malibu Landscape Lighting Fixtures
Choosing the right fixture depends on the task. Here are the most common types:
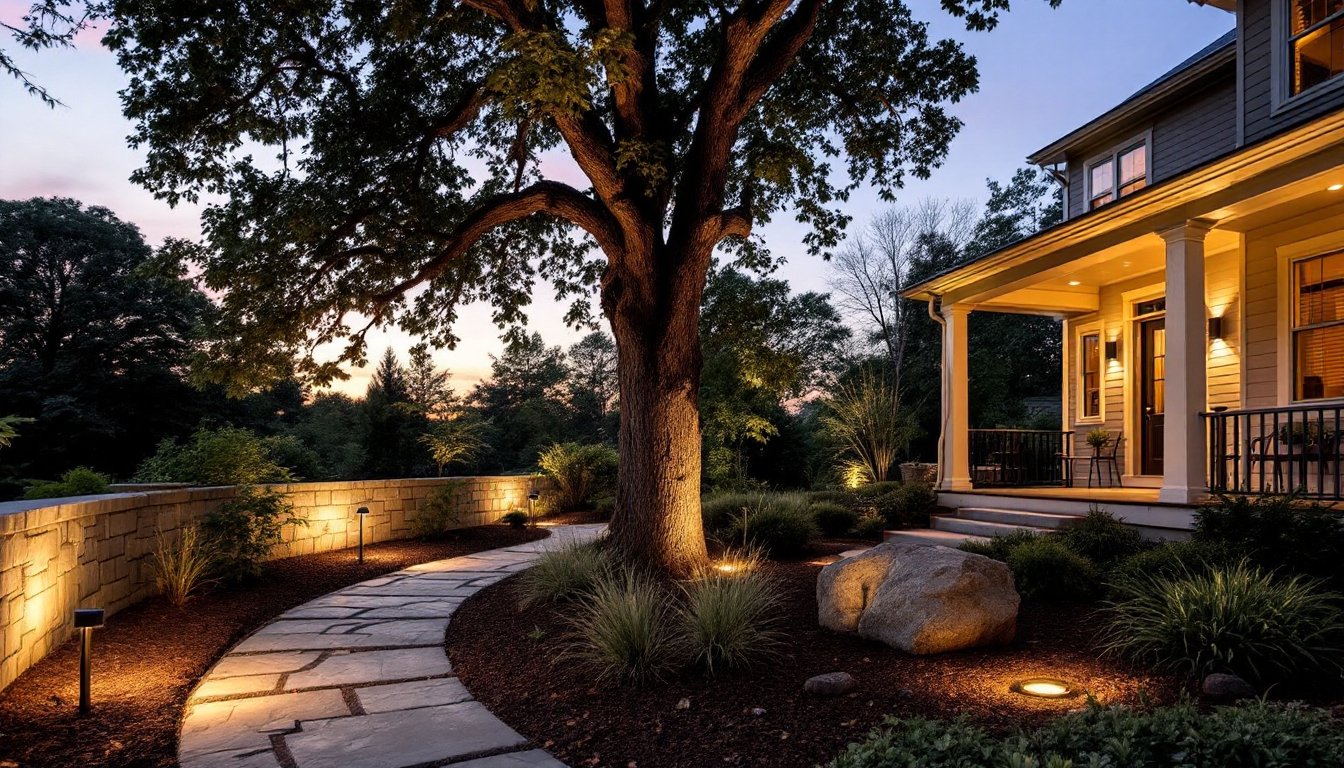
Path lights are the workhorses of landscape lighting. They stand 12 to 24 inches tall and direct light downward to illuminate walkways and driveways. Look for fixtures with hoods or shields to reduce glare and prevent light pollution.
Spotlights and floodlights provide focused or broad beams for accent lighting. Use spotlights (narrow beam, 15–30 degrees) to uplight trees, architectural features, or statuary. Floodlights (wider beam, 60+ degrees) work well for washing walls or lighting larger plantings. Many models come with adjustable stakes and swivel heads.
Well lights mount flush with the ground, often used in planting beds or near the base of trees. They require a bit more installation effort, digging a hole, ensuring drainage, but provide a clean, unobtrusive look.
Deck and step lights are low-profile fixtures that mount to vertical or horizontal surfaces. They improve safety on stairs and transitions while adding subtle accent lighting. Most use surface-mount brackets or recess into posts.
Hardscape lights integrate into retaining walls, pillars, or paver edges. These typically require planning during construction, though some retrofit models are available.
String lights and decorative fixtures add ambiance for patios and pergolas. While not always Malibu-branded, many are compatible with low-voltage transformers.
How to Install Malibu Low Voltage Lighting Systems
Installation takes a few hours for a typical system. Here’s the process:
Plan the Layout
Sketch the property and mark fixture locations. Measure the cable run from the transformer to the farthest fixture. Voltage drop becomes an issue on long runs (over 100 feet), causing dimming at distant fixtures. Split long runs into separate circuits or use heavier gauge wire (12 AWG instead of 14 AWG).
Calculate total wattage by adding up all fixture bulbs. Choose a transformer rated at least 20% higher than the total load. For example, if fixtures total 100 watts, use a 120-watt or larger transformer.
Mount the Transformer
Install the transformer near a GFCI-protected outdoor outlet. Most units mount to a wall or post using screws. Keep it at least 12 inches above ground to avoid water exposure. If the transformer includes a photocell or timer, position it where it can sense ambient light or be easily accessed for adjustments.
Lay the Cable
Run the low-voltage cable along the planned route. For buried installation, dig a trench 4 to 6 inches deep using a flat spade or trenching tool. Avoid sharp bends, which can damage wire insulation. If crossing a lawn, slice the turf with a spade, tuck the cable in, and press the grass back.
Some DIYers prefer surface installation under mulch or along bed edges. This works fine but leaves cable more vulnerable to damage from tools or foot traffic.
Connect the Fixtures
Malibu fixtures typically use a quick-connect clamp that pierces the cable insulation to make contact with the wires. Position the cable in the connector base, place the fixture clamp over it, and tighten the screw or lever. No wire stripping is required.
Space fixtures evenly and test each one before burying the cable. If a light doesn’t turn on, check the connection and ensure the bulb is seated properly.
Wire the Transformer
Connect the cable ends to the transformer’s output terminals. Most models use screw terminals or quick-connect ports. Polarity matters with LEDs: if a fixture doesn’t light, reverse the wires at the transformer.
Plug in the transformer and set the timer or photocell. Test the system at dusk to confirm all fixtures illuminate and brightness is consistent.
Bury and Finish
Once the system works, backfill trenches and tamp the soil. Mark cable routes on a property sketch for future reference, this helps avoid accidental cuts during landscaping.
Design Tips for Maximizing Your Malibu Lighting Setup
Good landscape lighting design balances function and aesthetics. Here’s how to get it right:
Layer the lighting. Combine path lights for safety, accent lights for focal points, and ambient lighting for gathering areas. A yard lit only with path lights feels flat and utilitarian.
Use odd numbers. Grouping fixtures in threes or fives creates visual interest. A single spotlight on a tree can look stark: three at varying distances add depth.
Aim for subtlety. Overlighting makes a yard feel like a parking lot. The goal is to highlight features, not flood them. Start with lower-wattage bulbs (1–3 watts for LEDs) and add more if needed.
Avoid glare. Position fixtures so the light source isn’t visible from common sightlines. Use shielded path lights and aim spotlights away from windows and seating areas.
Consider color temperature. Warm white (2700–3000K) suits most residential landscapes, creating a cozy, inviting feel. Cool white (4000K+) works for modern designs but can feel harsh.
Highlight texture. Graze light across stone walls, tree bark, or architectural details to emphasize texture. Position the fixture close to the surface and aim it at a shallow angle.
Test before committing. Set fixtures in place without burying cable and evaluate the effect at night. Adjust spacing and angles until the layout feels balanced.
Maintenance and Troubleshooting Your Malibu Lights
Low-voltage systems are low-maintenance, but a few tasks keep them running smoothly.
Clean fixtures annually. Dirt, spider webs, and oxidation reduce light output. Wipe lenses with a damp cloth and use a soft brush on metal finishes. For brass or copper fixtures, apply a clear coat or let them patina naturally.
Check connections. Corrosion at quick-connect clamps is common. If a fixture dims or flickers, disconnect it, clean the contact points with a wire brush, and reconnect. Dielectric grease can prevent future corrosion.
Replace bulbs as needed. LED bulbs last 20,000–50,000 hours, but halogen bulbs burn out every 1–2 years. Keep spares on hand and match the wattage and base type (wedge, bi-pin, etc.).
Inspect the transformer. Listen for humming or buzzing, which can indicate overload or failing components. If the transformer feels excessively hot, reduce the fixture count or upgrade to a higher-capacity model.
Address voltage drop. If distant fixtures dim over time, the issue is likely voltage drop. Solutions include using heavier gauge wire, splitting the run into two circuits, or adding a second transformer.
Protect against moisture. Though rated for outdoor use, transformers and connections benefit from shelter. A weatherproof cover or placement under an eave extends lifespan.
Watch for cable damage. Accidentally cutting the cable with a shovel or edger is the most common failure. If a section of lights goes dark, inspect the cable run for nicks or breaks. Splice damaged sections using waterproof wire connectors.
Conclusion
Malibu landscape lighting delivers professional-looking results without the cost or complexity of line-voltage systems. The low-voltage design makes installation approachable for most DIYers, and the flexibility allows for adjustments as landscaping evolves. With proper planning, quality fixtures, and routine maintenance, a Malibu system can provide years of safe, attractive outdoor illumination.

